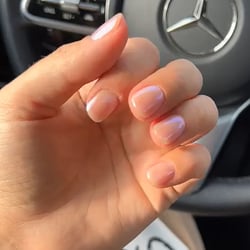
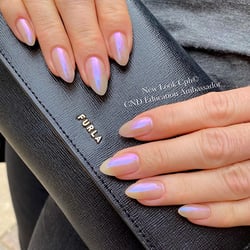
Donut Glaze Nails
In this article, you'll learn how to create the trendy glazed donut look on your nails with our simple step-by-step guide
SHELLAC™ - On natural nails
 1. PERFORM P.E.P.
- Make sure to thoroughly cleanse the natural nail free edge with ScrubFresh™
2. APPLY BASE COAT
- Where base coat goes the colour follows
- Cure for 10 seconds on button 1 in the CND™ LED lamp
3. APPLY COLOR
- Apply 2 layers of colour of your choice. Layers should be thin and evenly applied
- Cure each layer for 1 minute on button 2S in the CND™ LED lamp
- Chose a colour that is slightly transparent such as: Beau, Bouquet, White Wedding etc.
- Colour can be either whiter or pink depending on the look that you would like to achieve
4. APPLY SHELLAC™ NO WIPE+ TOP COAT
- Apply a layer of No Wipe Top Coat in a thin even layer
NOTE: Do not seal the free edge. Powder on the free edge can prevent good sealing/adhesion of the top coat and cause chipping.
- Let it settle for a few seconds before curing to make sure there are pitting or unevenness of the surface of the nail
- Cure for 1 minute on button 3 in the CND™ LED lamp
5. APPLY CHROME POWDER
- Use a disposable eyeshadow brush, a make-up sponge, or a gloved finger to apply the powder
- Any iridescent Chrome Powder can be used. Here are a couple of suggestions:
Lecente: Two of a kind, Pearlescent, Two´s company etc.
CND: Lightning Bolt or Off the Chain
YOURS: Pink Pearl
- Remove any powder from the free edge either with a wipe slightly moistened with IPA or a corrector pen
- Brush away any excess powder. If not removed it will show as ”glitter” once top coat is applied
6. APPLY TOP COAT
- Apply a layer of CND Shellac Original Top Coat and cure for 1 minute on button 3
- Pay attention to thoroughly seal the free edge to prevent chipping
7. REMOVE TOP FILM
- Remove top film with a wipe moistened with TopFinish/IPA
8. NOURISH NAILS & SKIN
- Finish the service with a drop of SolarOil™ and massage into the nail and surrounding skin
SHELLAC™ - over already sculpted enhancements
 1. ENHANCEMENTS
- Perform finishing filing
- Surface should be buffed with a 180-grit file or finer
- Remove dust from the surface of the nail
2. APPLY COLOR
- SHELLAC™ Base Coat can be skipped and you can go straight to first layer of color
- Apply 2 layers of colour of your choice. Layers should be thin and evenly applied
- Cure each layer for 1 minute on button 2S in the CND™ LED lamp
- Chose a colour that is slightly transparent such as: Beau, Bouquet, White Wedding etc.
- Colour can be either whiter or pink depending on the look that you would like to achieve
- If enhancements are sculpted in a opaque pink colour, just go with Clearly Pink
3. APPLY SHELLAC™ NO WIPE+ TOP COAT
- Apply a layer of No Wipe Top Coat in a thin even layer
- NOTE: Do not seal the free edge. Powder on the free edge can prevent good sealing/adhesion of the top coat and cause chipping.
- Let it settle for a few seconds before curing to make sure there are pitting or unevenness of the surface of the nail
- Cure for 1 minute on button 3 in the CND™ LED lamp
4. APPLY CHROME POWDER
- Use a disposable eyeshadow brush, a make-up sponge or a gloved finger to apply the powder
- Any iridescent Chrome Powder can be used. Here are a couple of suggestions:
Lecente: Two of a kind, Pearlescent, Two´s company etc.
CND: Lightning Bolt or Off the Chain
YOURS: Pink Pearl
- Remove any powder from the free edge either with a wipe slightly moistened with IPA or a corrector pen
- Brush away any excess powder. If not removed, it will show as ”glitter” once top coat is applied
5. APPLY TOP COAT
- Apply a layer of CND Shellac Original Top Coat and cure for 1 minute on button 3
- Pay attention to thoroughly seal the free edge to prevent chipping. A slight buffing of the free edge prior to top coat application can be an extra precaution to prevent lifting.
NOTE: A gel top coat is not designed to adhere to a “slick” surface, so it may chip if applied over a chrome powder. A gel polish top coat is the preferred choice here.
- You CAN use either of the CND Shellac Top Coats, also No Wipe+ Top Coat. Just be aware that No Wipe+ Top Coat and Xpress5 Top Coat are more prone to discoloration if worn more than 2+ weeks. In general, Original or Duraforce Top Coat are recommended over enhancements as they are designed to be worn 3+ weeks.
6. REMOVE TOP FILM
- Remove top film with a wipe moistened with TopFinish/IPA
7. NOURISH NAILS & SKIN
- Finish the service with a drop of SolarOil™ and massage into the nail and surrounding skin
Here you can find the products:
ScrubFresh™
CND™ SHELLAC™ BASE COAT
CND™ LED lamp
CND™ SHELLAC™ Gel Polish Colors: Beau, Bouquet, White Wedding
SHELLAC™ NO WIPE+ TOP COAT
Lecente: Two of a kind, Pearlescent, Two´s company etc.
CND: Lightning Bolt , Off the Chain
YOURS: Pink Pearl
CND™ Shellac™ Original Top Coat
TopFinish/IPA
Corrector pen
SolarOil™
Would you like to learn more about CND™?
At Insight Cosmetics Group, we have a variety of contact and training options available to you as a professional beauty therapist.
- Call us under (DK) +45 3332 3322.| (DE) +49 (0) 221 920 490 | (AT) +43 (0) 720 881 062 | (CH) +41 (0) 415 880 432 | (SE) 08-40 83 82 33 | (FI) 09 31579233
- Feel free to write us an email to info@icgroup.dk.
- Discover the free e-learning app and take part in one of our exciting CND™ e-learning training courses
/2023%20Easter%20Sale/Glazed-Donut-Mette-3.png?width=600&height=300&name=Glazed-Donut-Mette-3.png)