Your Guide to Overcoming SHELLAC®™ Challenges
At CND™, we take pride in supporting you to overcome the common challenges of working with SHELLAC®™. In the article below, we've gathered the most frequent issues, providing detailed insights into why they happen and actionable steps to solve them.
By carefully reviewing these tips, you'll be able to troubleshoot your own application techniques, improve your skills, and empower your employees to deliver exceptional results. Remember, we're always here to assist if you need further guidance on troubleshooting or enhancing your techniques.
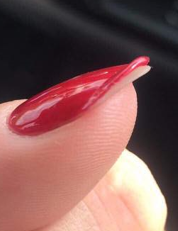
Problem 1: The Product Lifts from the Free Edge
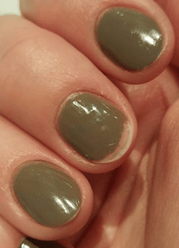
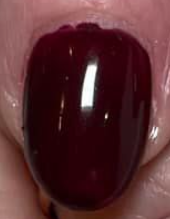
Problem 2: The Surface of the Color Wrinkles After Curing
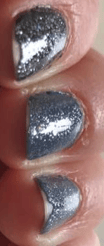
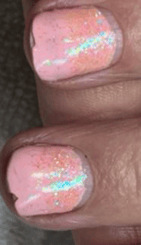
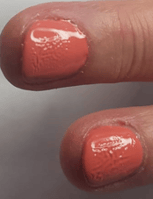
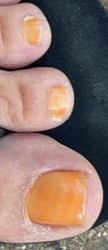
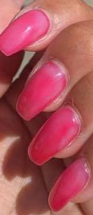
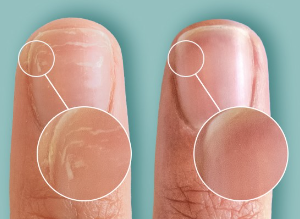
Problem 3: Discoloration
Problem 4: The SHELLAC®™ Service Takes Too Long to Complete
Problem 5: My SHELLAC®™ Services Do Not Last for 2+ Weeks
Problem 6: Streaks in the Color During Application
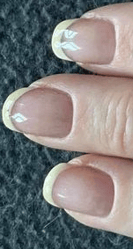
Problem 7: Uneven Application at the Cuticle Line and Sidewalls
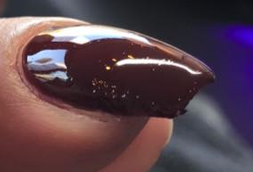
Problem 8: The Top Coat Turns Matte After Curing
Let´s shed light on different challenges that can occur with the SHELLAC®™ services. Below you will find some of the most common SHELLAC®™ application challenges.
Problem 1: The Product Lifts from the Free Edge
Why It Happens
Insufficient Performance of P.E.P.
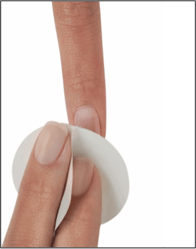
A proper manicure, also known as P.E.P. (Perform, Exfoliate, Prepare), is essential for ensuring the adhesion of SHELLAC®™. This process includes thoroughly cleansing both the surface of the natural nail and the natural nail free edge. Without this step, lifting is likely to occur.
How to Solve It
Improve P.E.P. Performance:
Use ScrubFresh™ to cleanse and temporarily dehydrate the nails. Pay special attention to the free edge—clean thoroughly both on and under the edge to ensure optimal Base Coat adhesion.
Why It Happens
The Seal Is Missing
The natural nail free edge must be sealed with every layer of SHELLAC®™—the Base Coat, both layers of Color Coat, and the Top Coat. Proper sealing creates protective layers that safeguard the nail and prevent the product from chipping or lifting.
How to Solve It
Properly Seal the Free Edge:
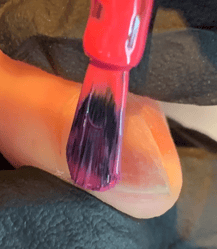
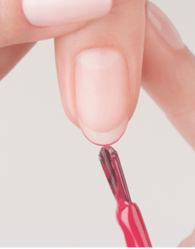
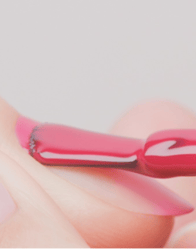
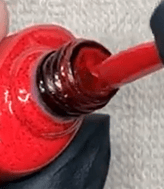
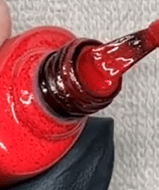
Create a proper seal by applying product evenly to the free edge. Flatten the brush on both sides, removing excess product from one side, and leave a small amount on the other. For very short nails, reverse the brush and "scrape" the product onto the free edge.
Why It Happens
Under Curing of SHELLAC®™
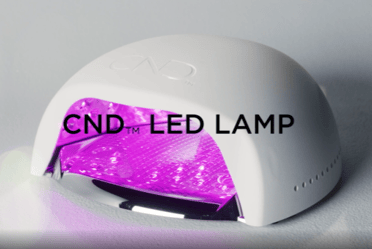
Insufficient curing can result from applying thick layers of product, incorrect hand placement in the lamp, or using a non-CND™ LED lamp. Curing is critical to ensuring the product bonds effectively to the nail.
How to Solve It
Ensure Correct Curing:
- Apply thin, even layers to prevent under curing and ensure the product doesn’t feel rubbery or lift during wear.
- Position the thumb in the alignment spot before pressing the buttons on the CND™ LED lamp.
- Always cure SHELLAC®™ in the original CND™ LED lamp to ensure proper results.
Why It Happens
Use of Incorrect Application Techniques
Using improper application techniques can weaken the durability of the SHELLAC®™ service. Adherence to proper protocols, such as the CND™ 5 Point Polish Method, is vital for long-lasting results.
How to Solve It
Follow Correct Application Techniques:
Master the CND™ 5 Point Polish Method to improve consistency and control during SHELLAC®™ application. Proper brush control ensures a professional finish and reduces product waste.
Why It Happens
Wrong Choice of Service
In some cases, the customer’s natural nails may require a more durable solution than SHELLAC®™ can provide.
How to Solve It
Choose the Right Service for the Customer:
For clients with weak nails, strengthen the natural nail using the CND™ PLEXIGEL™ system before applying SHELLAC®™. This overlay provides additional support and ensures longer-lasting results.
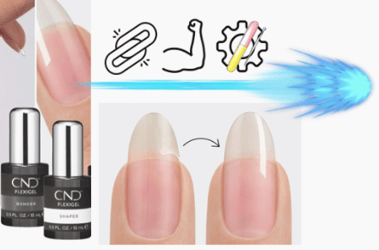
You can learn more about the CND™ PLEXIGEL™ system here
Why It Happens
Wrong Choice of Base Coat
Not all nails are the same. While the Original Base Coat is suitable for many, some nails may require the added strength of the Wear Extender™ Base Coat. Conversely, using the Wear Extender™ on nails that are already strong may reduce durability.
How to Solve It
Select the Appropriate Base Coat:
Determine the best Base Coat by consulting with the customer about their nail condition and lifestyle. Ask questions like:
- Are the nails healthy and normal in strength, or are they weak and damaged?
- What is the client’s work environment (e.g., office, cleaning, warehouse)?
- What is their desired time between services (2+ or 3+ weeks)?
Why It Happens
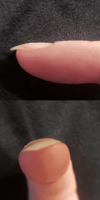
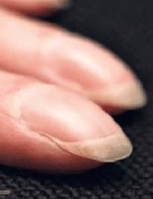
Shape of the Natural Nails
Extremely curvy nails that grow downwards at the free edge can make it difficult for light to cure the product evenly.
How to Solve It
Adjust for Curvy Nails:
For nails with extreme curvature:
- Apply 3 very thin layers instead of 2.
- If the product is difficult to cure, double cure the first layer of color on the 2S button.
Why It Happens
Base Coat Applied Too Thick or Over Cured
The SHELLAC®™ Base Coat is responsible for adhesion. Applying it too thickly or curing it for longer than recommended can disrupt its ability to bond effectively.
How to Solve It
Avoid Applying Base Coat Too Thick or Over Curing:
- Apply a thin, controlled layer of Base Coat. Use just enough product to coat the nail without requiring multiple strokes.
- Cure Base Coat for exactly 10 seconds on Button 1 in the CND™ LED lamp. Ensure the client’s hand is placed properly before activating the lamp to avoid curing delays.
By addressing these potential causes and following the solutions, you can minimize lifting and achieve flawless, long-lasting SHELLAC®™ results. Remember, attention to detail in application and adherence to proper techniques are key to success.
Problem 2: The Surface of the Color Wrinkles After Curing
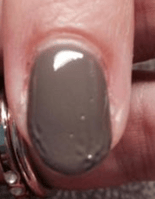
Why It Happens
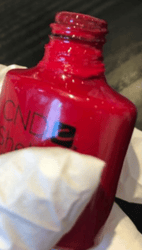
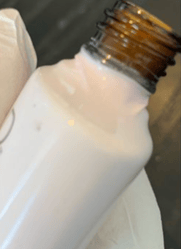
Color Has Gone Thick
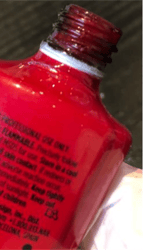
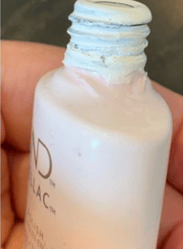
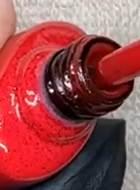
SHELLAC®™ colors can thicken if solvents in the bottle evaporate. Solvents are the liquid components that keep the product smooth and workable. Thickened colors often lead to under-curing, resulting in wrinkles or a rubbery texture that is easy for customers to peel off.
- Example: Colors like Indigo Frock can appear thick and uneven if not shaken properly, especially after prolonged storage.
How to Solve It
Prevent Colors from Thickening:
- Ensure bottle necks and caps are clean and free of product to prevent evaporation of solvents. Create a protocol in the salon to check this regularly, especially if bottles are shared among professionals.
- Shake new colors (or those left unused for a while) for 1–3 minutes to blend the formula thoroughly. Regularly used colors can be shaken for 30 seconds before application.
- Replace thickened colors with new bottles. Attempting to use overly thick colors will cause ongoing service problems.

Why It Happens
Layers Are Applied Too Thick
Applying thick layers of SHELLAC®™ prevents UV light from penetrating through the product fully, leaving uncured patches that wrinkle during wear. This is due to the formula containing more pigments than the UV light can effectively cure.
How to Solve It
Apply Thin, Even Layers:
- Always apply thin, even layers of color. The first layer should be semi-transparent and may appear streaky—this is normal and will even out after the second layer.
- If you suspect the color is too thick or old, try curing the first layer twice on button 2S. However, this is a temporary solution. Replace old or thick colors as soon as possible to maintain salon success.
Why It Happens
Issue with the CND™ LED Lamp
If bulbs in your CND™ LED lamp are dirty or malfunctioning, or if the lamp isn’t specifically designed for SHELLAC®™, the product may not cure correctly, leading to wrinkling or other issues.
How to Solve It
Maintain Your CND™ LED Lamp:
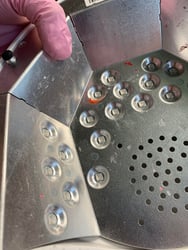
- Regularly inspect your CND™ LED lamp to ensure all bulbs are functioning properly. Bulbs covered in product or malfunctioning will affect curing.
- Clean bulbs and the inner surface of the lamp with Offly Fast™ Moisturizing Remover using a lint-free wipe. Avoid scraping with sharp tools to prevent damage.
- If you’re using an older CND™ LED lamp, consider upgrading to the newest version for optimal curing performance.

Why It Happens
Wrong Placement of Hands in the Lamp
Curing times are short, and improper hand placement can disrupt the curing process if even a small portion of the nail isn’t exposed to light during those critical seconds.
How to Solve It
Teach Proper Hand Placement:
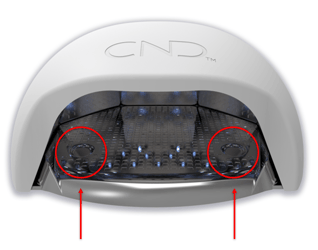
- Ensure customers place their hands correctly in the alignment guides before pressing any buttons. Educate them to keep their hands still during curing. Thumbs should align with the red marks, and then you can press the button.
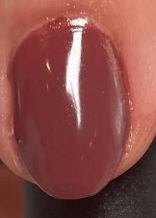
Problem 3: Discoloration

Why It Happens
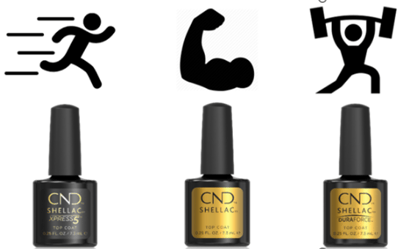
Wrong Choice of Top Coat
Choosing a top coat that doesn’t match the customer’s nail condition or lifestyle can lead to discoloration. For instance, clients with hands-on jobs need a more durable top coat, like Duraforce™, rather than lighter options such as Xpress5™.
How to solve it
How to Solve It
Choose the Right Top Coat:
- Consult with the customer to understand their nail condition and lifestyle. Ask questions such as:
- Are the nails healthy or damaged?
- What type of work do they do (office, cleaning, warehouse)?
- What is their desired time between services (2+ or 3+ weeks)?
- When in doubt, always select a stronger top coat like Duraforce.
Why It Happens
Top Coat Applied Too Thinly
A thin application of top coat or insufficient sealing can leave the nail unprotected, allowing dirt or solvents to stain the product.
How to Solve It
Apply Top Coat Correctly
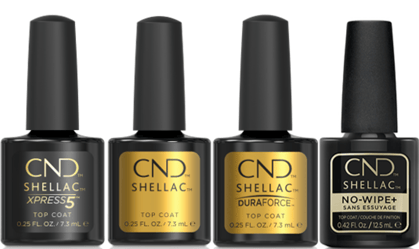
Understand the viscosity of each top coat:
Each CND™ SHELLAC®™ Top Coat has a unique viscosity, designed to meet specific nail needs. Applying them correctly is crucial for achieving a long-lasting, flawless finish. Here’s how to handle each type:
-
Thin Viscosity (e.g., Xpress5™): This top coat has a water-like consistency, making it easy to apply too little product. Imagine dipping your hand into a bucket of water; only a small amount clings to your skin. Similarly, when using Xpress5™, ensure you scoop enough product onto the brush to fully coat the nail. Avoid scraping the brush too clean on the bottle neck, as this can result in a patchy application. Thin viscosity top coats are ideal for clients seeking a quick removal process but require careful application for durability.
-
Medium Viscosity (e.g., SHELLAC®™ Original Top Coat): With an oil-like consistency, the Original Top Coat provides excellent coverage without being overly thick. Apply enough product to evenly coat the nail, ensuring there are no streaks or uneven areas. This top coat is versatile and suitable for most nail types, offering a balance of durability and removal ease.
-
Thicker Viscosity (e.g., Duraforce™): Duraforce™ has a butter-like texture, providing added strength and protection for weak or damaged nails. While it offers superior durability, be cautious not to overload the brush with product. Too much top coat can lead to pooling around the cuticle and uneven curing. Flatten the brush slightly on both sides before applying to maintain control.
Use a Floating Motion:
Regardless of the top coat's viscosity, always apply using a floating motion. This technique involves keeping a drop of product between the brush and the nail, allowing the product to glide smoothly across the surface without dragging. Floating ensures a streak-free, even layer and prevents the brush bristles from pressing too firmly into the product, which can cause streaks or pits.
Additional Tips for Top Coat Application:
- Cap the Free Edge: Seal the free edge of the nail with every layer, including the Top Coat. This step locks in the product and prevents chipping or peeling during wear.
- Maintain Consistency: Avoid going back over an already-applied area unless necessary. Overworking the product can cause unevenness and disrupt the curing process.
- Check for Reflection: Use the light from your workstation to check for an even, glossy finish before curing. Any matte or streaky areas indicate uneven application and should be corrected before placing the hand in the lamp.
- Use the Right Brush Pressure: Allow the bristles to glide gently over the nail without pressing too hard. Excess pressure can remove product and create uneven spots.
By mastering the correct application techniques for each viscosity, you can maximize the durability and aesthetic of every SHELLAC®™ manicure, ensuring customer satisfaction and long-lasting results.
Why It Happens
Exposure to Sunlight
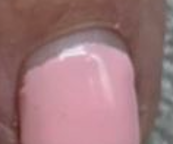
Colors with pink pigments are particularly prone to fading or discoloration when exposed to sunlight. This is often noticeable during summer or vacations where SPF products, pool water, and sun exposure combine.
How to Solve It
Protect Against Sunlight:
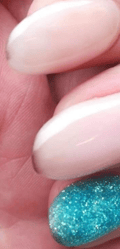
- Apply two layers of top coat to strengthen the surface and minimize solvent penetration.
- For pink pigments, advise customers to avoid SPF or pool chemicals on their nails, or add a layer of glitter to disguise potential fading.
Why It Happens
Missing or Insufficient Seal
Failing to seal all layers properly—Base Coat, Color Coat, and Top Coat—allows solvents and dirt to seep in, leading to discoloration at the free edge.
How to Solve It
Seal All Layers Properly:
- Clean the natural nail free edge thoroughly with ScrubFresh™ before application.
- Seal the free edge during every step of the process, from Base Coat to Top Coat.
- Educate clients not to file the free edge after application to preserve the seal.
Why It Happens
Exposure to Solvents
Products like self-tanners, cleaning agents, or even curry can stain SHELLAC®™ when overexposed. Repeated exposure increases the likelihood of staining.
How to Solve It
Minimize Solvent Exposure:
- Recommend clients wear gloves during cleaning, gardening, or dishwashing.
- If staining occurs, buff the surface gently with the fine side of the Koala™ Buffer (1200-grit). Clean with TopFinish™ (99% IPA) and reapply a fresh layer of top coat.

Problem 4: The SHELLAC®™ Service Takes Too Long to Complete
Want to save time while delivering flawless SHELLAC®™ services? Follow these expert tips to optimize your process, manage customers effectively, and streamline removal. Learn more today!
Why It Happens
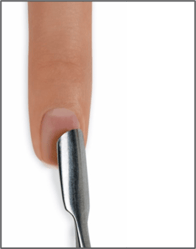
Spending Too Much Time on P.E.P.
Preparation of the natural nails, also known as P.E.P. (Perform, Exfoliate, Prepare), is essential, but overdoing it can unnecessarily extend your service time. If the customer hasn’t booked a manicure with their SHELLAC®™ service, you might be unintentionally providing a free full manicure. This extra time adds up, delaying your schedule.
How to Solve It
Optimize P.E.P.:
Set clear timing expectations for the P.E.P. process:
- Quick P.E.P. – 10 Minutes:
- Gently push back the proximal nail fold.
- Remove cuticle.
- Shape nails.
- Cleanse thoroughly.
By keeping P.E.P. under 10 minutes, you can streamline your preparation while maintaining high-quality results.

Why It Happens
Wrong or Insufficient Application Techniques
When starting with SHELLAC®™, many professionals tend to overwork the application process. Spending too much time perfecting every stroke or step can lead to inefficiencies and increased service times.
How to Solve It
Improve Application Techniques:
-
Master the CND™ 5 Point Polish Technique:
- This technique ensures a consistent and even application, reducing the time spent perfecting each layer.
- Proper brush control will save time, reduce product waste, and deliver professional results.
-
Count Your Strokes:
- Pay attention to how many strokes you use to apply each layer. For example, are you applying SHELLAC®™ with 5 strokes, 20 strokes, or even more? Minimizing unnecessary strokes can significantly reduce application time.

Why It Happens
Customer Handling Takes Too Long
Indecision from customers, especially when choosing colors, can delay your process significantly. For example, spending 10–20 minutes waiting for a customer to decide on a color before starting P.E.P. can disrupt your workflow and create a ripple effect of delays.
How to Solve It
Manage Customer Handling Efficiently:
Encourage customers to choose their color before their appointment:
- Invite Early Arrival: Ask customers to arrive 10 minutes before their service to select their color.
- Use Removal Time Wisely: During the removal process, have the customer decide on their next color.
Integrating color selection into the service flow reduces decision-making delays and helps you stay on schedule. Educating customers about this process creates a win-win situation, saving time for both parties.

Why It Happens
Prolonged Removal Time
Removal is a common area where time gets wasted. Rushing to remove leftover product with tools like orange wood sticks or cuticle pushers can actually make future removals harder, creating a cycle of increasingly difficult removal processes.
How to Solve It
Streamline the Removal Process:
To achieve quick and gentle removal:
- Use Offly Fast™ Moisturizing Remover: Saturate a cotton pad and wrap all 10 fingers with remover wraps.
- Set a Timer: Follow the specific removal time for the SHELLAC®™ Top Coat used. Be patient and wait for the timer.
- Massage the Wraps: Gently massage the wraps before removal to loosen the product.
- Look for the Butterfly Effect: If the product doesn’t lift cleanly, rewrap the nails and continue with the remaining fingers. Return to the problem nail afterward.
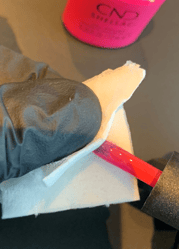
- Avoid Tools: Do not scrape with cuticle pushers or file the natural nail. Use a plastic-backed hands-down pad saturated with remover to clean any remaining residue.
Following this protocol ensures a completely clean surface while preserving the natural nail, and prevents future removal difficulties.
Target Service Times
- P.E.P.: 10 minutes
- SHELLAC®™ Application: 20 minutes (Base Coat, Color Coat, and Top Coat)
By following these optimized timings and techniques, you can deliver efficient, high-quality SHELLAC®™ services while staying on schedule.
Want to ensure your SHELLAC®™ services last longer? Explore our expert tips and techniques for durable, flawless nails that stand the test of time. Learn more about strengthening systems and proper protocols todayExamples of why it happens.
Why It Happens
SHELLAC®™ May Not Be the Right Choice for the Customer
SHELLAC®™ is a fantastic solution for many, but it may not provide enough strength for certain customers. If a client struggles to keep their SHELLAC®™ intact for over two weeks, their nails may require a stronger foundation. Conditions such as weak or overly flexible nails or a lifestyle that involves heavy manual work can compromise the durability of SHELLAC®™, even with Wear Extender™ Base Coat or Duraforce™ Top Coat.
How to Solve It
Use CND™ PLEXIGEL™:
- Apply CND™ PLEXIGEL™ as a strengthening booster underneath SHELLAC®™. This additional layer provides extra durability and ensures the SHELLAC®™ lasts longer.
- Learn more about the PLEXIGEL™ system and how it can support your services.
Get Professional Support:
- Contact your distributor to identify the best enhancement systems for your salon.
- Enhance your skills with educational courses in:
- CND™ PLEXIGEL™
- CND™ Brisa Gel
- CND™ L&P (Acrylic)
Why It Happens
Poor Condition of Natural Nails
SHELLAC®™ adheres best to healthy nails. If the client’s nails are weak, damaged, or overfilled, they may need repair before SHELLAC®™ application or a stronger protective layer to withstand daily wear and tear.
How to Solve It
Repair and Strengthen the Nails:
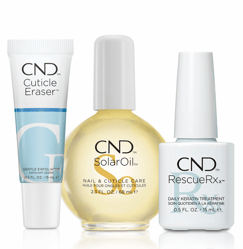
Recommend the following home care products to clients to restore nail health:
- CND™ SolarOil™ – For daily nourishment and hydration.
- CND™ RescueRXx™ – To repair and strengthen damaged nails.
- CND™ Cuticle Eraser™ – To maintain healthy cuticles and prevent nail issues.
Encourage clients to follow a consistent nail care routine to improve nail strength and durability over time.
Why It Happens
Incorrect Top Coat Selection
Choosing the wrong top coat for a client’s nail condition or lifestyle can lead to premature chipping, peeling, or discoloration. For instance, a lighter top coat like Xpress5™ or No Wipe+™ may not provide the required durability for clients with heavy-handed work.
How to Solve It
Choose the Right Top Coat for Each Customer:
- Conduct a consultation to evaluate the client’s nail condition and lifestyle.
- Consider the following factors:
- Are their nails healthy or damaged?
- What type of work do they do (e.g., office, warehouse, cleaning)?
- How long do they expect their manicure to last (2+ or 3+ weeks)?
- When in doubt, opt for a stronger top coat like Duraforce™.

Why It Happens
Incorrect Base Coat Selection
While Wear Extender™ Base Coat provides added strength, using it on overly strong or hard nails can reduce durability. In these cases, the more flexible Original Base Coat may be a better choice.
How to Solve It
Evaluate and Select the Correct Base Coat:
Perform a consultation to assess the client’s natural nails and expectations for the service. Ask questions like:
- Are their nails healthy and strong or weak and damaged?
- What type of work do they do (manual labor, office, cleaning)?
- What is their ideal time between appointments?
As you gain experience with your customers, you’ll become more adept at matching the Base Coat to their specific needs.
Why It Happens
Using Colors That Are Too Old
Over time, SHELLAC®™ colors can thicken if not used regularly or shaken properly, leading to uneven application and poor durability.
How to Solve It
Maintain Fresh Colors:
- Keep Bottle Necks and Caps Clean: Residue can cause solvents to evaporate, thickening the product.
- Shake Properly: Shake colors for 1–3 minutes if they’ve been unused for a while to reblend the formula. For regularly used colors, a 30-second shake is sufficient.
- Replace Old Colors: Thickened or goopy colors should be discarded and replaced with fresh bottles.
Why It Happens
Deviating from the correct SHELLAC®™ application steps can compromise the durability and quality of the service.
How to Solve It
Stay Up-to-Date on Protocols:
- Revisit step-by-step guides to ensure every stage is executed correctly.
- Take advantage of SHELLAC®™ E-Learning Classes to refresh your knowledge and stay updated on best practices.
Problem 6: Streaks in the Color During Application

Master Pastel Perfection: Tips for Streak-Free SHELLAC®™ Application"
Discover how to achieve flawless, streak-free pastel nails with expert guidance on brush angles, pressure control, and even application techniques.
Why It Happens
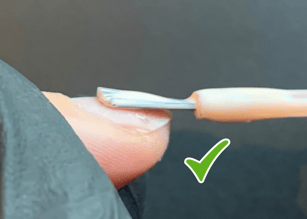
Wrong Angle of Brush
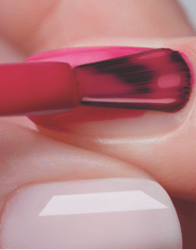
Using the brush at the wrong angle can cause uneven application, especially when working with pastel colors. This issue arises because an angled brush often removes the product from the surface of the nail instead of spreading it evenly. The problem worsens as the solvents in the polish evaporate, making streaks more visible with each brush stroke. Once streaks appear, they are difficult to correct.
How to Solve It
- Keep the Brush Parallel to the Nail: Always hold the brush parallel to the surface of the nail to ensure even coverage.
- Use a Floating Motion: Maintain a drop of color between the brush and the nail surface to glide the product into place, ensuring smooth application without streaks or pits.
Why It Happens
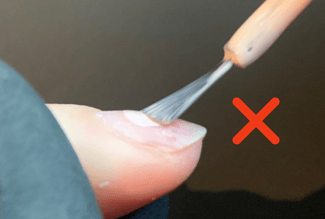
Using Too Much Pressure When Applying Pastel Colors
Applying too much pressure spreads the brush hairs excessively, causing the product to be applied too thinly and unevenly. This pressure can result in streaks and make the color difficult to settle evenly.
How to Solve It
- Apply with a Light Touch: Avoid heavy pressure. Use a floating motion to guide the product over the nail surface without removing it.
- Understand Floating vs. Heavy Pressure: Imagine smoothing sand on a beach. Instead of digging with force, lightly pat the surface to even it out. This is the motion needed for pastel and brighter colors.
Why It Happens
Applying the Color Too Thinly
Thin layers of pastel colors can amplify streaks, especially when combined with poor brush control or excessive pressure.
How to Solve It
- Apply Even, Thin Layers: Use light pressure and a flat brush to achieve smooth, even layers. The first coat may appear slightly streaky, but the second coat will provide full coverage when applied correctly.
- Maintain the Floating Technique: Focus on gliding the product across the nail rather than pressing it into the surface.
Problem 7: Uneven Application at the Cuticle Line and Sidewalls
Achieve Flawless SHELLAC®™ Application: Troubleshoot and Perfect Your Technique"
Learn how to avoid common pitfalls and ensure smooth, even application every time. From proper nail preparation to mastering brush techniques, these actionable tips will elevate your results and keep your clients coming back for more.
Why It Happens
Improper P.E.P. (Perform, Exfoliate, Prepare)
If the nail plate isn’t thoroughly cleansed or prepared, leftover cuticle or dust can prevent even application around the perimeter of the nail.
How to Solve It
- Gentle Use of Tools: Avoid scraping too hard with a cuticle pusher, as this can damage the nail surface and create uneven application.
- Thorough Cleansing: Clean the nail plate, especially around the cuticle and sidewalls, with ScrubFresh™ to remove any residue or dust.
Why It Happens
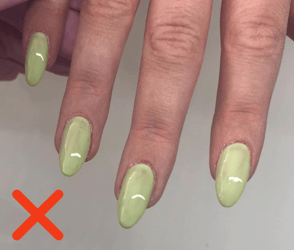
Uneven Base Coat Application
If the Base Coat isn’t applied evenly or close enough to the cuticle and sidewalls, the subsequent layers won’t adhere properly, resulting in uneven color.
How to Solve It
- Flatten and Drain the Brush: Work with a flat, drained brush to allow precise application near the cuticle and sidewalls without flooding the area.
- Use Lighting to Check Coverage: The reflection of light can help identify any missed spots on the nail surface.
Why It Happens
Working from Above Without Rotating the Finger
Not rotating the customer’s finger makes it difficult to see and properly paint the sidewalls. This oversight can result in uneven application.
How to Solve It
-
Follow the CND™ 5 Point Polish Method:
- Step 1: Seal the free edge.
- Step 2: Apply a bead in the middle.
- Step 3: Rotate the finger to the right and paint the left side of the nail.
- Step 4: Rotate the finger to the left and paint the right side of the nail.
- Step 5: Refine as needed.
-
Pull Back the Skin: Use your fingers to pull back the skin around the sidewalls for better visibility and precision.
Why It Happens
Using the Brush Straight Out of the Bottle
Without flattening or draining the brush, it can hold too much product, leading to uneven application and difficulty in getting close to the skin.
How to Solve It
- Drain and Flatten the Brush: Remove excess product on the inside of the bottle neck. Flatten the brush on both sides for better control.
- Apply Product Strategically: Use a small amount of product to seal the free edge first, then load the brush with more product for the main application.

Why It Happens
Brush Still Contains Starch from Production
Occasionally, brushes may retain starch from manufacturing, leaving lint-like streaks in the application.
How to Solve It
- Clean the Brush: Wipe the brush thoroughly with TopFinish™ (99% IPA) to remove any residual starch or debris.
- Clean the Bottle and Cap: Remove the brush from the cap and clean both thoroughly with TopFinish™ to ensure a clean application.
Problem 8: The Top Coat Turns Matte After Curing
Struggling with matte top coats? Follow these expert tips for flawless SHELLAC®™ finishes every time. Learn more about professional application and troubleshooting
Why It Happens
Under Curing
If the CND™ LED lamp is not operating at optimal output, the top coat may not cure fully, resulting in a matte finish. This can also happen if the customer’s hand is not positioned correctly in the lamp or if the curing button is pressed before the hand is lying still in the lamp.
How to Solve It
To ensure proper curing and achieve an optimum shine, follow these steps:
- Check the Bulbs: Make sure all bulbs in the lamp are functioning properly and are free of product buildup or residue.
- Ensure Proper Hand Placement: Verify that the customer’s hand is aligned correctly in the lamp and remains still throughout the curing process. Only press the curing button once the hand is in place.
Why It Happens
Too Thin Application
A thin application of the top coat can result in an uneven layer that appears matte after curing.
How to Solve It
Proper Application of SHELLAC®™ Top Coats:
- Use a Floating Motion: Apply the top coat with a floating motion. Maintain a drop of product between the brush and the nail surface to glide the product evenly without dragging or pressing.
- Avoid Excess Force: If you use too much force, the brush hairs will spread out, causing:
- An overly thin application.
- An uneven surface with streaks or pits that won’t level properly.
Understanding Floating vs. Excessive Force:
Imagine sitting on the beach and smoothing sand with your hand. To move sand, you dig with force, spreading your fingers. To make the surface smooth, you flatten your hand and gently pet the sand. This light, even motion is what you need to apply top coats effectively.
Why It Happens
Incorrect Removal of the Top Film
Removing the top film too soon after curing or applying too much pressure during the removal process can cause the top coat to appear matte.
How to Solve It
- Wait 60 Seconds After Curing: Allow the top coat to cool for at least 60 seconds before removing the top film.
- Use Proper Technique: Moisten a wipe with TopFinish™ (99% IPA) and use gentle, circular motions to remove the top film. Avoid applying too much pressure, as this can dull the finish.

Would you like to learn more about CND™?
At Insight Cosmetics Group, we have a variety of contact and training options available to you as a professional beauty therapist.
- Call us under (DK) +45 3332 3322.| (DE) +49 (0) 221 920 490 | (AT) +43 (0) 720 881 062 | (CH) +41 (0) 415 880 432 | (SE) 08-40 83 82 33 | (FI) 09 31579233
- Feel free to write us an email to info@icgroup.dk.
- Discover the free e-learning app and take part in one of our exciting CND™ e-learning training courses